Saturday 31 December 2016

NEW YEAR MAKEUP LOOK

Hey guys..Happy New year..Let 2017 be an amazing year for each and everyone..Most of you will be attending cocktail parties so I just thought why not do a makeup tutorial for you guys..
1.Prime & Prep:
Colour correct your eyelids if needed; always use an eyeshadow base before you apply any eyeshadow. I applied a concealer and patted on some powder to avoid creasing.
2.Define the Crease:
Define the crease with a soft brown, I used one by MAC called Cork I think not sure.

You can stick a tape to mark out the outer V of your eyes (optional)

3.Purple it up!:
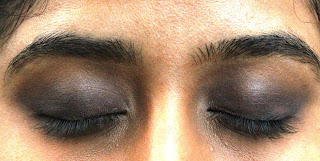
Pat on some purple eyeshadow all over your eyelids including the outer V, just below your crease.
With a small quantity of brown eyeshadow blend that into the crease. The end result should be something like a purple smokey eye. I used one by MAC called Shadowy Lady, you can also use Sketch by MAC or any other purple for that matter.
                   Quick Tip: You can apply some purple liquid lipstick before eyeshadow to minimize amount of shadow used and kind of like a base.

4.(optional) Just a hint of black wouldn't hurt anybody. Add some black eyeshadow (to intensify the purple)just to the outer V and blend it outwards. I used one by MAC called Carbon.

5.On the inner 1/3 rd pat on some icy silver or any highlight colour of your choice. I used one by MAC called Rice Paper.

Blend between the highlight colour and the purple. Add more purple or the highlight colour if needed and blend them together. Repeat the steps on your lower lashline.

6.(optional) Jazz up the look by adding some glitter/pigments. I added one of my favourite PAC shimmer eyeshadow(big) no:15. I spritzed the brush with some Fix+ by MAC. If you are applying some glitter, pat on some glitter glue on the desired area and then pat on some glitter; If you are applying some pigment, spritz some fixing spray on the brush and then use it to pat on the pigments.

7.Apply liner, mascara and lashes. I used Music flower black liner and lined my waterline with a Colorbar kohl; MAYBELLINE lash sensational mascara and Kryolan lashes.

8.I also have a lip option for you guys.. Any lipstick with a hint of mauve or purple in it would do..I used one by MAC called Creme in your coffee. OMG I love that colour..it just looks amazing..I also have a dupe for this one. It's from MAYBELLINE called Fall for Mauve. The best part..this lipstick is matte finish..


Looking forward to a fabulous year.. Join and support me in this journey..Lets rock 2017 with glamour and style..
ADIEU 2016..With love and kisses..

Tuesday 27 December 2016

MAYBELLINE BABY LIPS 'BRIGHT OUT LOUD' - REVIEW

Hey guys..Hope y'all had an amazing Christmas. I had the best time..Sephora 'finally' launched their outlet in Chennai this Christmas and OMG! it felt like heaven..You wouldn't believe how crowded it was..'jam-packed' would be the smallest word to describe.
                                                          So Winter is fully upon us and it is necessary that we take good care of our skin especially your lips, they are super soft and sensitive compared to other areas of your face. As usual I wanted to try out a new launch of my trustworthy 'baby lips'  by MAYBELLINE. They have four colours in this range called 'Bright Out Loud' and the one that I bought was a bright red colour called 'Vivid Peach'.

Packaging: 

The lip balm comes in a sleek plastic retractable tube with quirky teal (rest had neon-ish coloured) coloured writings on it. It is sturdy and would fit right into any corner of your purse hence travel friendly.

Claims: 
  • Provides 8 hour moisturisation
  • Sheer pop of colour with a glossy shine
  • Enriched with Vitamin E, Jojoba oil and Shea butter
  • Intense care and repair
  • Heal and sooth dry or chapped lips 
  • Lips are visibly renewed after one week.           
     
Ingredients:

^^ Image from Google 

Application:
Coat your lips with the product directly from the tube.

What I Felt?
 As I already told you I was pretty excited about this product..but I am slightly disappointed with this one. I have to say it is not as good as the original Baby lips. The product is very sheer but still gives a decent coverage. They advertise it to be richly pigmented, has full coverage like a lipstick and moisturising but it's a big no. It has a soft sheen whilst application but dries off quickly. I love the buttery formula of the product, helps it glide easily onto your lips. It also has SPF 13 in it. It has Menthol extracts in it that helps soothe your lips. It is not moisturising but the colour stays on your lips for a good 5hrs. It won't hide the pigmentations on your lips and it sits onto your dry patches.

Net quantity:
1.9 g

The 3 R's:
Retails for- Rs. 190/-
Recommend- For this price point and for the long lasting colour- yes! 
Ratings- 3.5/5 

Friday 16 December 2016

CHRISTMAS EYE LOOK

Hey guys..With Christmas coming around the corner, it would be a shame if I didn't do a make-up tutorial..I created an eye-look with "red" as key colour (sorry guys it looks pink). This step by step tutorial was created with all affordable products and guess what this looks good on any complexion. Also, this look can be worn at weddings or any festive, functions etc,. Hope y'all like it..
1.Prime your eyes.
      I used my KRYOLAN ULTRA UNDERBASE primer on the lids..you can use any eye primer for that matter. A primer helps the eye make-up last longer and helps prevent the eye-base or in my case concealer from creasing.

2.Colour correcting.
     I used an orange corrector to correct her discolouration and her under eye dark circles. Take a pump, apply and blend it well on the areas of discolouration. The one that I used on her is from L.A
Girl (oorange concealer).


 A colour corrector is basically used to counter act or neutralise the discolouration and helps achieve a flawless face after foundation and concealer. Here is a set of colours (correctors) that can be used to neutralise certain discolouration,
  • mild stubborn redness or rosiness: yellow corrector
  • brownish dark circles: yellow or peach corrector
  • sallowness/yellowness: lavender corrector
  • redness:green corrector
  • dark circles, fair to light complexion: salmon corrector
  • dark circles, light to medium complexion: peach corrector
  • dark circles, medium to dark complexion: orange corrector
  • dark circles, dark to deep complexion: red concealer
3.Eyeshadow base.
     Apply either an eyeshadow base or a concealer/foundation on to your eyelids from your brow bone and blend well. I used KRYOLAN DERMA concealer on her eyes. Remember when you use a concealer/foundation on your eyes always set it with powder to avoid creasing. An eyeshadow base helps the colour pop and look more vibrant.

4.Highlight your brow bone/under your brows with either a matte or a shimmer colour.

5.Add any brown colour in to your crease and blend it using 'wind-shield wiper' or 'circular motion'. I mixed two browns from  MAYBELLINE'S NUDE PALLET (5th shade from top Left-Right and 2nd shade from bottom Left-Right).

 Adding a crease colour will define your crease and aids blending of other shadows easily and seamlessly.

6.Add any Red colour in to your crease again and blend it inwards (towards the lid) in circular motion. And also add the same red on the outer 1/3 rd of your eyelid and blend well. I used PAC MATTE EYESHADOW NO. 15.
 

7.Put a Rose gold colour on to your lids (inner 2/3 rd) in a padding motion till the outer 1/3 rd of your eyes. With a very little quantity of that red blend both the colours.
I used a rose gold colour from the MAYBELLINE'S BLUSHED PALLET (4th shade from the top Left-Right).

8.(This step is totally optional) Using a lighter pink colour (see to it that it has some gold particles so it would go along with the rose gold) and define your inner corner/tear duct of your eyes and blend it inwards as in blend it with the rose gold colour.I used a pink colour from MAYBELLINE'S BLUSHED PALLET (3rd colour from the top Left-Right).
Adding a lighter colour in your tear ducts would open up your eyes and make you look fresh and wide awake. 
                                        (step 7 & 8 are shown in the same picture)

9.Blend everything together, if needed add a second layer of the colours to pop.

10.(This step is totally optional) Add glitter/pigment if you want. I didn't add any pigment/glitter but I did add a gold shimmer eyeshadow from PAC SHIMMER EYESHADOW BIG NO. 15.
Adding glitter/pigment would make the look more vibrant and three dimensional.

11.Repeat the same steps on the lower lash line..Add brown, blend it; then add red and blend it well. In the inner corners add the light pink.

12.Add liner, mascara and false lashes if needed. I used MUSIC FLOWER black eyeliner on the lids and her water line; PAC mascara; I didn't add any lashes on her (she wasn't comfortable wearing false lashes) but if you're willing to wear false lashes I highly recommend PAC lashes..they are super cheap and are of good quality. Apply a thin layer of lash glue on to the lash band and wait for 10 sec, place it as close to the lash line as possible.

And hey don't forget to do your brows..they make a big difference..
If you want me to do more looks feel free to comment down below..I would be happy to do them for y'all..and sorry guys I accidentally deleted few pictures.

MERRY CHRISTMAS!!

MODEL: LOHITYA SETHURAMAN (My sister 😉🙎)

Saturday 10 December 2016

P.A.C RETRO MATTE LIPGLOSS-REVIEW

Hey guys..Hope y'all are doing fine..What are your plans for Christmas? So P.A.C recently launched their retro matte lip glosses and I was super excited to try them, got my package around 8th Dec and here is my review on it. I bought three shades: no:11, 13 and 20 and all of 'em are way out my comfort zone..No: 11 is a Hot pink colour with the hint of mauve-y brown; No: 13 is a pure orange and No:20 is a dark (very, very dark) brown colour with the hint of purple in it.. All the colours are absolutely amazing.


Packaging:
The lipstick comes in a hard plastic tube, therefore travel friendly. The applicator is small which eases the application in the outer corner of the lips. Liquid lipsticks are easy to carry around because of their packaging and are more long-lasting than creme lipsticks.

Claims:

  • Light weight
  • Non-drying formula
  • Opaque payoff with just one swipe
  • Dries down matte right after one swipe
  • For best results- avoid oily food
Ingredients:


Application:
Use a nude/coloured lip liner to outline the lips(if needed, can fill in the lips). Start applying the lipstick from the centre of the lips to the outer corner of the lips. As mentioned, one swipe is sufficient.

What I felt?
 It is a matte liquid lipstick unlike the name. It dries off real quick. Eventhough it claims to have a non-drying formula, it dries out your lips like hell..so I would highly recommend you to exfoliate and moisturize your lips before hand. It has a tiny bit of sheen giving a velvety finish. These lipsticks are richly pigmented, one swipe of the colour is more than sufficient. The applicator picks up the right amount of product. It is not transfer proof but still does not budge even while eating (except for oily foods). It is not tacky or patchy and are very long lasting (minimum of 6 hrs). Removing them is also super easy, just use an oil based makeup remover and it comes right off. The best part is that it's cruelty free. P.A.C has variety of shades ranging from pinky nudes to orange,reds and browns to suit every Indian skin tone/complexion.

About the colours, to my surprise no:11, looked really good on me..hot pinks never suited me and most of the other dusky girls but the slightest hint of brown made it look stunning.. no:13, as I guessed did not suit me..at all!! It would look amazing on fair complexion..no:20, such a goth-y, vamp-y colour but it was way too dark for me..but I guess I'll make them both(13 & 20) work by adding some nude lipstick or they can be used for doing Ombre lips..
If you would like a tutorial on Ombre lips, please comment down below..I would be happy to do it for you guys.

Net quantity:
6.5 ml (each)

The 3 R's:
Retails for- Rs. 550
Recommend- Definitely..give it a try.
Rating- 4/5

Saturday 3 December 2016

FAVOURITE PRODUCT OF THE MONTH (NOVEMBER)

Hey guys..Hope you're all doing fine..I just thought of starting a series sort of a thing where every month I'll be discussing about my "ride or die" product of that month..Hope you all like it..

COLORBAR - KISS PROOF LIP STAIN IN THE SHADE HAUTE LATTE (007)


Winter has officially started and it's time for deep,dark lips.. I'm such a crazy fan of reds but lately I've been reaching out for this lippie..But guess what not just me but a bunch of bloggers are in love with this product right now and I can't wait to share with you guys..
            It is a pretty mauve-y brown colour in a hard plastic tube.It's travel friendly and the best feature about this is the applicator, helps apply the product easily on to the corners of the lips..I got lots of compliments every single time I wore this colour..Suitable for all Indian skin tones and complexion..The product claims to be kiss-proof, non-transferable and long-lasting with velvety finish..
        It's a lip stain but does the job of a liquid lipstick, dries matte real quick..It is very drying on lips..They have a variety of shades in this range..I have to agree that it gives a velvety texture and stays long..but it is definitely not kiss proof or transfer proof (budges when you eat something)..Other than that I love the product mainly for the colour..It's just the perfect colour for winter..And also I'm so happy that COLORBAR has launched a new range-DEEP MATTE LIP CREMEs and I'm so excited to try and review it for you guys..
Net quantity: 6.5 ml
Price: INR 900 but it's available fo INR 700 at NYKAA.COM
This range has various other colours ranging from deep red to purple, pink etc..,give it a try..I'm sure you won't regret buying them.

#colourbar #kissproof #lipstain #liquidlipstick #hautelatte #loveit #winterblues #theglamourspell #beautyandpd